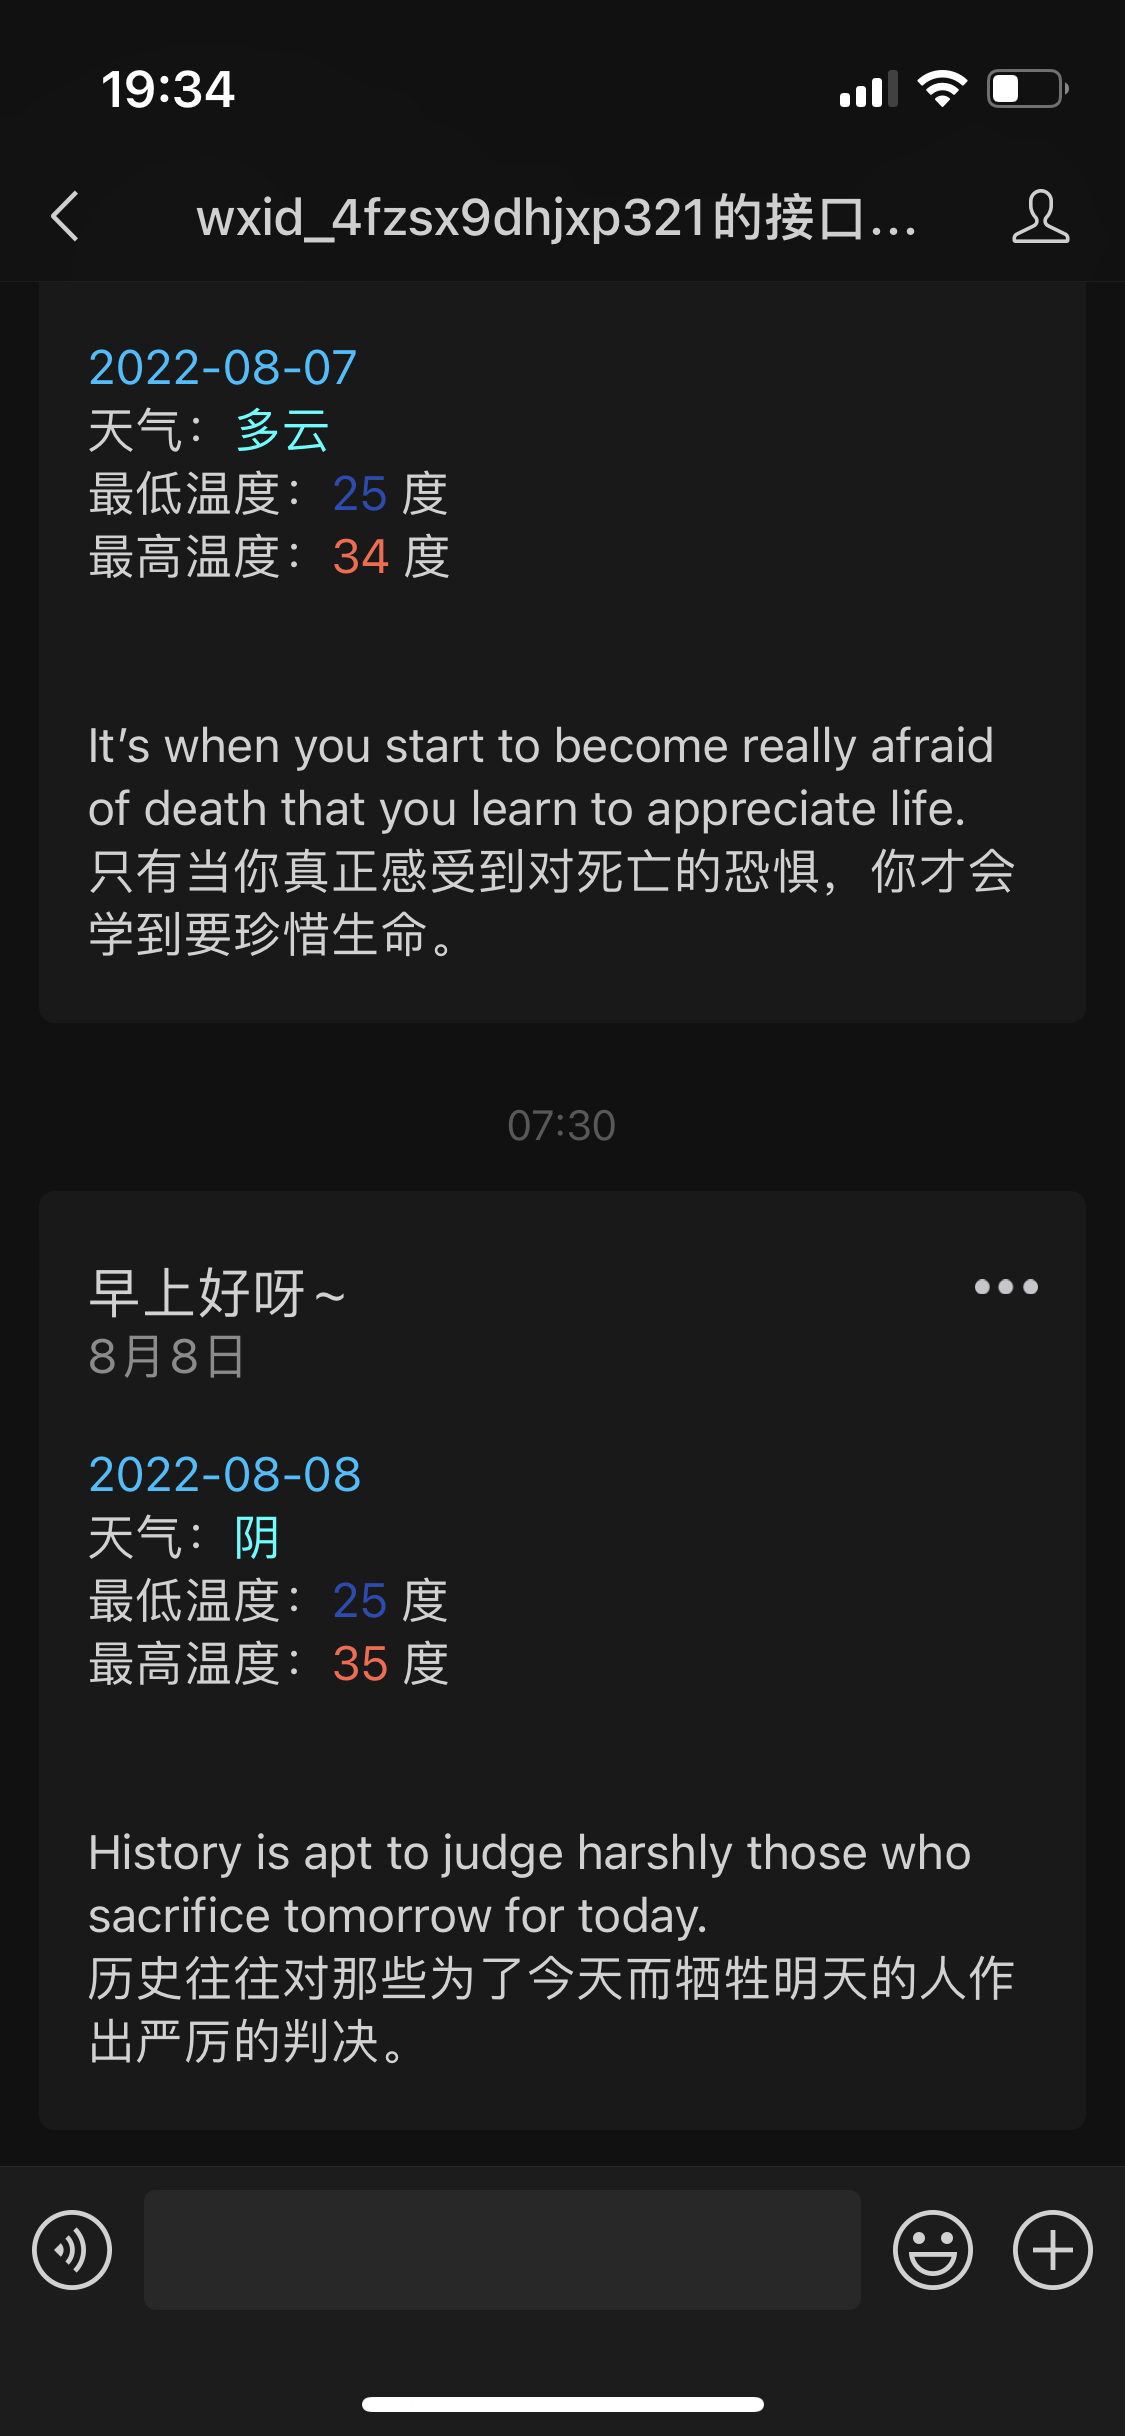
看到一个特别有意思的项目,每天早上微信工作号推送天气什么的,可以自定义很多消息,自己动手实现了下,写了个demo,实现的效果如下,比较简陋,后续有空再完善下吧
申请微信公众号测试账号
访问 https://mp.weixin.qq.com/debug/cgi-bin/sandbox?t=sandbox/login ,扫码登录成功后,就会给我们生成微信公号的appid和appsecret。

新建SpringBoot项目
所需依赖
pom.xml
1
2
3
4
5
6
7
8
9
10
11
12
13
14
15
16
17
18
19
20
21
22
23
24
25
26
27
28
29
30
31
32
33
34
35
36
37
38
39
40
41
42
43
44
45
46
47
48
49
50
51
52
53
54
55
56
57
| <?xml version="1.0" encoding="UTF-8"?>
<project xmlns="http://maven.apache.org/POM/4.0.0" xmlns:xsi="http://www.w3.org/2001/XMLSchema-instance"
xsi:schemaLocation="http://maven.apache.org/POM/4.0.0 https://maven.apache.org/xsd/maven-4.0.0.xsd">
<modelVersion>4.0.0</modelVersion>
<parent>
<groupId>org.springframework.boot</groupId>
<artifactId>spring-boot-starter-parent</artifactId>
<version>2.7.2</version>
<relativePath/>
</parent>
<groupId>com.monochrome</groupId>
<artifactId>wechat-publisher</artifactId>
<version>0.0.1-SNAPSHOT</version>
<packaging>war</packaging>
<name>wechat-publisher</name>
<description>wechat-publisher</description>
<properties>
<java.version>1.8</java.version>
</properties>
<dependencies>
<dependency>
<groupId>org.springframework.boot</groupId>
<artifactId>spring-boot-starter-web</artifactId>
</dependency>
<dependency>
<groupId>org.springframework.boot</groupId>
<artifactId>spring-boot-configuration-processor</artifactId>
<optional>true</optional>
</dependency>
<dependency>
<groupId>com.github.binarywang</groupId>
<artifactId>wx-java-mp-spring-boot-starter</artifactId>
<version>4.3.0</version>
</dependency>
<dependency>
<groupId>com.alibaba</groupId>
<artifactId>fastjson</artifactId>
<version>1.2.76</version>
</dependency>
<dependency>
<groupId>org.springframework.boot</groupId>
<artifactId>spring-boot-starter-test</artifactId>
<scope>test</scope>
</dependency>
</dependencies>
<build>
<plugins>
<plugin>
<groupId>org.springframework.boot</groupId>
<artifactId>spring-boot-maven-plugin</artifactId>
</plugin>
</plugins>
</build>
</project>
|
配置文件
spring的配置文件application.yml
1
2
3
4
5
6
7
8
9
10
11
12
13
14
15
16
17
18
19
20
| spring:
application:
name: Wechat-Publisher
server:
port: 8080
wx:
mp:
app-id: your app id
secret: your app secret
com:
monochrome:
wx:
template:
good-morning: your WeChat template id
qweather:
id: qweather id
key: qweather key
location: 101270106
|
程序入口
加入@EnableScheduling注解以开启定时任务
1
2
3
4
5
6
7
8
9
| @SpringBootApplication
@EnableScheduling
public class WechatPublisherApplication {
public static void main(String[] args) {
SpringApplication.run(WechatPublisherApplication.class, args);
}
}
|
微信推送
获取配置的微信模板id
1
2
3
4
5
6
7
8
9
10
11
12
13
14
| @ConfigurationProperties(prefix = "com.monochrome.wx.template")
@Component
public class WxTemplateProperties {
private String goodMorning;
public String getGoodMorning() {
return goodMorning;
}
public void setGoodMorning(String goodMorning) {
this.goodMorning = goodMorning;
}
}
|
goodMorning对应上我们application.xml上面的com.monochrome.wx.template.good-morning,目前只配置了这一种模板,对应微信公众号平台上面的模板:
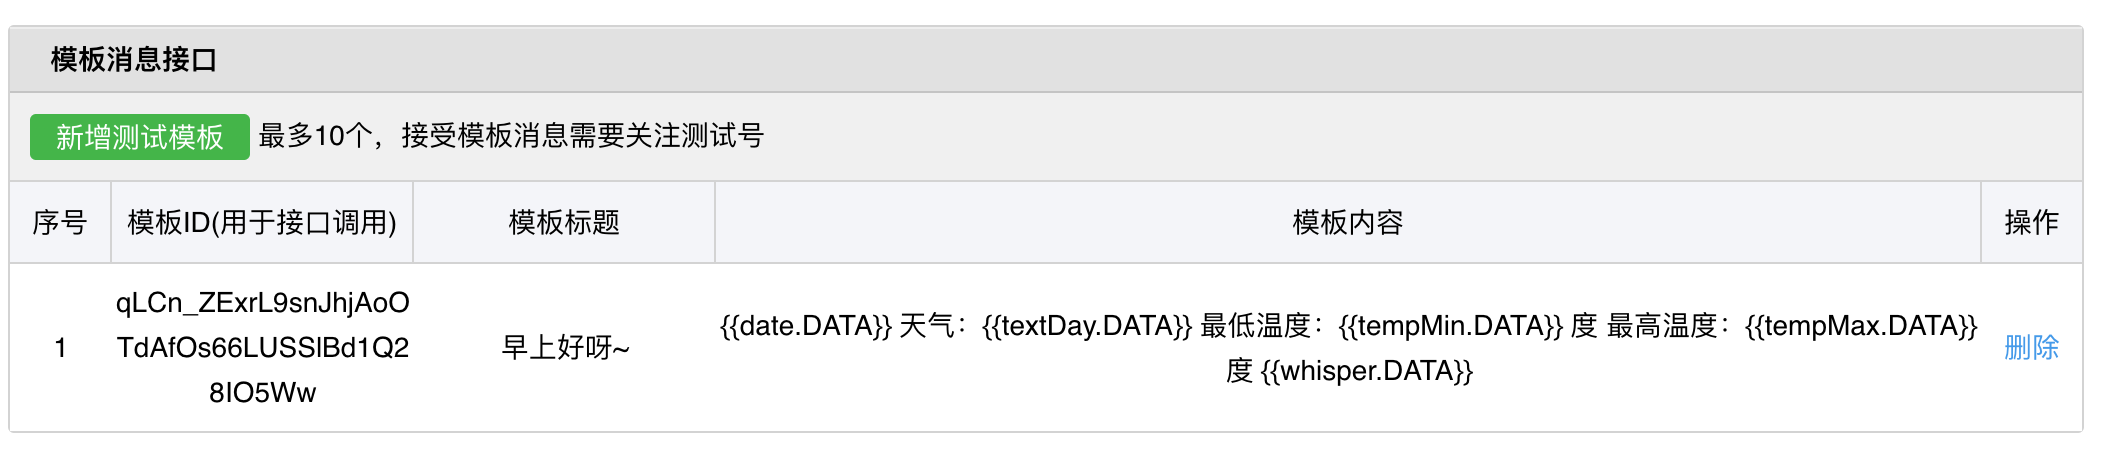
模板文本
1
2
3
4
5
6
| {{date.DATA}}
天气:{{textDay.DATA}}
最低温度:{{tempMin.DATA}} 度
最高温度:{{tempMax.DATA}} 度
{{whisper.DATA}}
|
消息推送
Publisher接口
1
2
3
| public interface Publisher {
void publish(String openId);
}
|
GoodMorningPublisher实现
1
2
3
4
5
6
7
8
9
10
11
12
13
14
15
16
17
18
19
20
21
22
23
24
25
26
27
28
29
30
31
32
33
34
35
36
| @Component
public class GoodMorningPublisher implements Publisher {
private final WxMpService wxMpService;
private final Whispers whispers;
private final QWeatherHelper qWeatherHelper;
private final WxTemplateProperties wxTemplateProperties;
public GoodMorningPublisher(WxMpService wxMpService, Whispers whispers, WxTemplateProperties wxTemplateProperties, QWeatherHelper qWeatherHelper) {
this.wxMpService = wxMpService;
this.whispers = whispers;
this.wxTemplateProperties = wxTemplateProperties;
this.qWeatherHelper = qWeatherHelper;
}
@Override
public void publish(String openId) {
WxMpTemplateMessage templateMessage = WxMpTemplateMessage.builder()
.toUser(openId)
.templateId(wxTemplateProperties.getGoodMorning())
.build();
Daily weather = qWeatherHelper.getWeather();
templateMessage.addData(new WxMpTemplateData("date", weather.getFxDate(), "#00BFFF"));
templateMessage.addData(new WxMpTemplateData("textDay", weather.getTextDay(), "#00FFFF"));
templateMessage.addData(new WxMpTemplateData("tempMin", weather.getTempMin(), "#173177"));
templateMessage.addData(new WxMpTemplateData("tempMax", weather.getTempMax(), "#FF6347"));
templateMessage.addData(new WxMpTemplateData("whisper", whispers.getRandomWhisper(), "#C71585"));
try {
wxMpService.getTemplateMsgService().sendTemplateMsg(templateMessage);
} catch (WxErrorException e) {
throw new RuntimeException(e);
}
}
}
|
对接和风天气API
首先先去申请和风天气账号拿到public id和primary key吧
具体实现看源码吧,这里不再贴代码了,照搬就行
定时任务
1
2
3
4
5
6
7
8
9
10
11
12
13
14
15
16
17
18
19
20
21
22
23
24
25
26
| @Component
public class PublisherJob {
private final GoodMorningPublisher goodMorningPublisher;
private final WxMpService wxMpService;
public PublisherJob(GoodMorningPublisher goodMorningPublisher, WxMpService wxMpService) {
this.goodMorningPublisher = goodMorningPublisher;
this.wxMpService = wxMpService;
}
@Scheduled(cron = "0 30 7 * * ?")
public void goodMorning(){
try {
WxMpUserList wxMpUserList = wxMpService.getUserService().userList(null);
List<String> openids = wxMpUserList.getOpenids();
for (String openid : openids) {
goodMorningPublisher.publish(openid);
}
} catch (WxErrorException e) {
throw new RuntimeException(e);
}
}
}
|
源码
源码放github上了,有兴趣的小伙伴可以下载下来直接改改配置文件就能使用了哦
https://github.com/zhaoyangmushiyi/wechat-publisher
结语
欢迎小伙伴关注我的微信公众号以获取推送哦