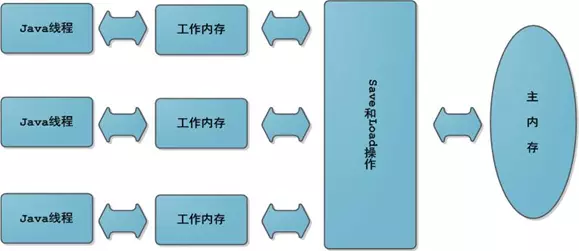
JMM JMM是指Java内存模型 ,不是Java内存布局 ,不是所谓的栈、堆、方法区。
每个Java线程都有自己的工作内存 。操作数据,首先从主内存中读,得到一份拷贝,操作完毕后再写回到主内存。
可见性 、原子性 和有序性 问题。所谓可见性,就是某个线程对主内存内容的更改,应该立刻通知到其它线程。原子性是指一个操作是不可分割的,不能执行到一半,就不执行了。所谓有序性,就是指令是有序的,不会被重排。
volatile关键字 volatile关键字是Java提供的一种轻量级 同步机制。它能够保证可见性 和有序性 ,但是不能保证原子性 。
可见性 可见性测试
1
2
3
4
5
6
7
8
9
10
11
12
13
14
15
16
17
18
19
20
21
22
23
24
25
26
27
28
29
30
31
32
33
34
class MyData { int number = 0 ; AtomicInteger atomicInteger=new AtomicInteger (); public void setTo60 () { this .number=60 ; } public void addPlusPlus () { number++; } public void addAtomic () { atomicInteger.getAndIncrement(); } } private static void volatileVisibilityDemo () { System.out.println("可见性测试" ); MyData myData = new MyData (); new Thread (()->{ System.out.println(Thread.currentThread().getName()+"\t come in" ); try {TimeUnit.SECONDS.sleep(3 );myData.setTo60(); System.out.println(Thread.currentThread().getName()+"\t update number value: " +myData.number);}catch (InterruptedException e){e.printStackTrace();} },"AAA" ).start(); while (myData.number==0 ){ } System.out.println(Thread.currentThread().getName()+"\t mission is over. main get number value: " +myData.number); }
MyData类是资源类,一开始number变量没有用volatile修饰,所以程序运行的结果是:
1
2
3
可见性测试 AAA come in AAA update number value: 60
虽然一个线程把number修改成了60,但是main线程持有的仍然是最开始的0,所以一直循环,程序不会结束。
如果对number添加了volatile修饰,运行结果是:
1
2
3
AAA come in AAA update number value: 60 main mission is over. main get number value: 60
可见某个线程对number的修改,会立刻反映到主内存上。
原子性 volatile并不能保证操作的原子性 。这是因为,比如一条number++的操作,会形成3条指令。
1
2
3
4
getfield //读 iconst_1 //++常量1 iadd //加操作 putfield //写操作
假设有3个线程,分别执行number++,都先从主内存中拿到最开始的值,number=0,然后三个线程分别进行操作。假设线程0执行完毕,number=1,也立刻通知到了其它线程,但是此时线程1、2已经拿到了number=0,所以结果就是写覆盖,线程1、2将number变成1。
解决的方式就是:
对addPlusPlus()方法加锁。
使用java.util.concurrent.AtomicInteger类。
1
2
3
4
5
6
7
8
9
10
11
12
13
14
15
16
17
private static void atomicDemo () { System.out.println("原子性测试" ); MyData myData=new MyData (); for (int i = 1 ; i <= 20 ; i++) { new Thread (()->{ for (int j = 0 ; j <1000 ; j++) { myData.addPlusPlus(); myData.addAtomic(); } },String.valueOf(i)).start(); } while (Thread.activeCount()>2 ){ Thread.yield(); } System.out.println(Thread.currentThread().getName()+"\t int type finally number value: " +myData.number); System.out.println(Thread.currentThread().getName()+"\t AtomicInteger type finally number value: " +myData.atomicInteger); }
结果:可见,由于volatile不能保证原子性,出现了线程重复写的问题,最终结果比20000小。而AtomicInteger可以保证原子性。
1
2
3
原子性测试 main int type finally number value: 17542 main AtomicInteger type finally number value: 20000
有序性 有序性案例
volatile可以保证有序性 ,也就是防止指令重排序 。所谓指令重排序,就是出于优化考虑,CPU执行指令的顺序跟程序员自己编写的顺序不一致。就好比一份试卷,题号是老师规定的,是程序员规定的,但是考生(CPU)可以先做选择,也可以先做填空。
1
2
3
4
int x = 11 ; int y = 12 ; x = x + 5 ; y = x * x;
以上例子,可能出现的执行顺序有1234、2134、1342,这三个都没有问题,最终结果都是x = 16,y=256。但是如果是4开头,就有问题了,y=0。这个时候就不需要 指令重排序。
volatile底层是用CPU的内存屏障 (Memory Barrier)指令来实现的,有两个作用,一个是保证特定操作的顺序性,二是保证变量的可见性。在指令之间插入一条Memory Barrier指令,告诉编译器和CPU,在Memory Barrier指令之间的指令不能被重排序。
哪些地方用到过volatile? 单例模式的安全问题 常见的DCL(Double Check Lock)模式虽然加了同步,但是在多线程下依然会有线程安全问题。
1
2
3
4
5
6
7
8
9
10
11
12
13
14
15
16
17
18
19
20
21
22
23
24
25
public class SingletonDemo { private static SingletonDemo singletonDemo=null ; private SingletonDemo () { System.out.println(Thread.currentThread().getName()+"\t 我是构造方法" ); } public static SingletonDemo getInstance () { if (singletonDemo==null ){ synchronized (SingletonDemo.class){ if (singletonDemo==null ){ singletonDemo=new SingletonDemo (); } } } return singletonDemo; } public static void main (String[] args) { for (int i = 0 ; i < 10 ; i++) { new Thread (()->{ SingletonDemo.getInstance(); },String.valueOf(i+1 )).start(); } } }
这个漏洞比较tricky,很难捕捉,但是是存在的。instance=new SingletonDemo();可以大致分为三步
1
2
3
memory = allocate(); instance(memory); instance = memory;
其中2、3没有数据依赖关系,可能发生重排 。如果发生,此时内存已经分配,那么instance=memory不为null。如果此时线程挂起,instance(memory)还未执行,对象还未初始化。由于instance!=null,所以两次判断都跳过,最后返回的instance没有任何内容,还没初始化。
解决的方法就是对singletondemo对象添加上volatile关键字,禁止指令重排。
CAS CAS是指Compare And Swap ,比较并交换 ,是一种很重要的同步思想。如果主内存的值跟期望值一样,那么就进行修改,否则一直重试,直到一致为止。
1
2
3
4
5
6
7
8
public class CASDemo { public static void main (String[] args) { AtomicInteger atomicInteger=new AtomicInteger (5 ); System.out.println(atomicInteger.compareAndSet(5 , 2019 )+"\t current data : " + atomicInteger.get()); System.out.println(atomicInteger.compareAndSet(5 , 1024 )+"\t current data : " + atomicInteger.get()); } }
第一次修改,期望值为5,主内存也为5,修改成功,为2019。第二次修改,期望值为5,主内存为2019,修改失败。
查看AtomicInteger.getAndIncrement()方法,发现其没有加synchronized也实现了同步 。这是为什么?
CAS底层原理 AtomicInteger内部维护了volatile int value和private static final Unsafe unsafe两个比较重要的参数。
1
2
3
public final int getAndIncrement () { return unsafe.getAndAddInt(this ,valueOffset,1 ); }
AtomicInteger.getAndIncrement()调用了Unsafe.getAndAddInt()方法。Unsafe类的大部分方法都是native的,用来像C语言一样从底层操作内存。
1
2
3
4
5
6
7
public final int getAnddAddInt (Object var1,long var2,int var4) { int var5; do { var5 = this .getIntVolatile(var1, var2); } while (!this .compareAndSwapInt(var1, var2, var5, var5 + var4)); return var5; }
这个方法的var1和var2,就是根据对象 和偏移量 得到在主内存的快照值 var5。然后compareAndSwapInt方法通过var1和var2得到当前主内存的实际值 。如果这个实际值 跟快照值 相等,那么就更新主内存的值为var5+var4。如果不等,那么就一直循环,一直获取快照,一直对比,直到实际值和快照值相等为止。
比如有A、B两个线程,一开始都从主内存中拷贝了原值为3,A线程执行到var5=this.getIntVolatile,即var5=3。此时A线程挂起,B修改原值为4,B线程执行完毕,由于加了volatile,所以这个修改是立即可见的。A线程被唤醒,执行this.compareAndSwapInt()方法,发现这个时候主内存的值不等于快照值3,所以继续循环,重新 从主内存获取。
CAS缺点 CAS实际上是一种自旋锁,
一直循环,开销比较大。
只能保证一个变量的原子操作,多个变量依然要加锁。
引出了ABA问题 。
ABA问题 所谓ABA问题,就是比较并交换的循环,存在一个时间差 ,而这个时间差可能带来意想不到的问题。比如线程T1将值从A改为B,然后又从B改为A。线程T2看到的就是A,但是却不知道这个A发生了更改 。尽管线程T2 CAS操作成功,但不代表就没有问题。只注重头和尾 ,只要首尾一致就接受。但是有的需求,还看重过程,中间不能发生任何修改,这就引出了AtomicReference原子引用。
AtomicReference AtomicInteger对整数进行原子操作,如果是一个POJO呢?可以用AtomicReference来包装这个POJO,使其操作原子化。
1
2
3
4
5
6
User user1 = new User ("Jack" ,25 );User user2 = new User ("Lucy" ,21 );AtomicReference<User> atomicReference = new AtomicReference <>(); atomicReference.set(user1); System.out.println(atomicReference.compareAndSet(user1,user2)); System.out.println(atomicReference.compareAndSet(user1,user2));
AtomicStampedReference和ABA问题的解决 使用AtomicStampedReference类可以解决ABA问题。这个类维护了一个“版本号 ”Stamp,在进行CAS操作的时候,不仅要比较当前值,还要比较版本号 。只有两者都相等,才执行更新操作。
1 AtomicStampedReference.compareAndSet(expectedReference,newReference,oldStamp,newStamp);
详见ABADemo 。
集合类不安全问题 List ArrayList不是线程安全类,在多线程同时写的情况下,会抛出java.util.ConcurrentModificationException异常。
1
2
3
4
5
6
7
8
9
private static void listNotSafe () { List<String> list=new ArrayList <>(); for (int i = 1 ; i <= 30 ; i++) { new Thread (() -> { list.add(UUID.randomUUID().toString().substring(0 , 8 )); System.out.println(Thread.currentThread().getName() + "\t" + list); }, String.valueOf(i)).start(); } }
解决方法 :
使用Vector(ArrayList所有方法加synchronized,太重)。
使用Collections.synchronizedList()转换成线程安全类。
使用java.concurrent.CopyOnWriteArrayList(推荐)。
CopyOnWriteArrayList 这是JUC的类,通过写时复制 来实现读写分离 。比如其add()方法,就是先复制 一个新数组,长度为原数组长度+1,然后将新数组最后一个元素设为添加的元素。
1
2
3
4
5
6
7
8
9
10
11
12
13
14
15
16
17
18
public boolean add (E e) { final ReentrantLock lock = this .lock; lock.lock(); try { Object[] elements = getArray(); int len = elements.length; Object[] newElements = Arrays.copyOf(elements, len + 1 ); newElements[len] = e; setArray(newElements); return true ; } finally { lock.unlock(); } }
Set 跟List类似,HashSet和TreeSet都不是线程安全的,与之对应的有CopyOnWriteSet这个线程安全类。这个类底层维护了一个CopyOnWriteArrayList数组。
1
2
3
4
private final CopyOnWriteArrayList<E> al;public CopyOnWriteArraySet () { al = new CopyOnWriteArrayList <E>(); }
HashSet和HashMap HashSet底层是用HashMap实现的。既然是用HashMap实现的,那HashMap.put()需要传两个参数 ,而HashSet.add()只传一个参数 ,这是为什么?实际上HashSet.add()就是调用的HashMap.put(),只不过Value 被写死了,是一个private static final Object对象。
Map HashMap不是线程安全的,Hashtable是线程安全的,但是跟Vector类似,太重量级。所以也有类似CopyOnWriteMap,只不过叫ConcurrentHashMap。
关于集合不安全类请看ContainerNotSafeDemo 。
Java锁 公平锁/非公平锁 概念 :所谓公平锁 ,就是多个线程按照申请锁的顺序 来获取锁,类似排队,先到先得。而非公平锁 ,则是多个线程抢夺锁,会导致优先级反转 或饥饿现象 。
区别 :公平锁在获取锁时先查看此锁维护的等待队列 ,为空 或者当前线程是等待队列的队首 ,则直接占有锁,否则插入到等待队列,FIFO原则。非公平锁比较粗鲁,上来直接先尝试占有锁 ,失败则采用公平锁方式。非公平锁的优点是吞吐量 比公平锁更大。
synchronized和juc.ReentrantLock默认都是非公平锁 。ReentrantLock在构造的时候传入true则是公平锁 。
可重入锁/递归锁 可重入锁又叫递归锁,指的同一个线程在外层方法 获得锁时,进入内层方法 会自动获取锁。也就是说,线程可以进入任何一个它已经拥有锁的代码块。比如get方法里面有set方法,两个方法都有同一把锁,得到了get的锁,就自动得到了set的锁。
就像有了家门的锁,厕所、书房、厨房就为你敞开了一样。可重入锁可以避免死锁 的问题。
ReentrantLockDemo:
1
2
3
4
5
6
7
8
9
10
11
12
13
14
15
16
17
18
19
20
21
22
23
24
25
26
27
28
29
30
31
32
33
34
35
36
37
38
39
40
41
42
43
44
45
46
47
48
49
50
51
52
53
54
55
56
57
58
59
60
61
62
63
64
65
66
67
68
69
70
71
import java.util.concurrent.locks.Lock;import java.util.concurrent.locks.ReentrantLock;public class ReentrantLockDemo { public static void main (String[] args) { Phone phone=new Phone (); syncTest(phone); System.out.println(); Thread t3=new Thread (phone); Thread t4=new Thread (phone); t3.start(); t4.start(); } private static void syncTest (Phone phone) { new Thread (()->{ try { phone.sendSMS(); }catch (Exception e){ e.printStackTrace(); } },"t1" ).start(); new Thread (()->{ try { phone.sendSMS(); }catch (Exception e){ e.printStackTrace(); } },"t2" ).start(); } } class Phone implements Runnable { public synchronized void sendSMS () { System.out.println(Thread.currentThread().getId()+"\t" +"sendSMS()" ); sendEmail(); } public synchronized void sendEmail () { System.out.println(Thread.currentThread().getId()+"\t" +"sendEmail()" ); } Lock lock=new ReentrantLock (); @Override public void run () { get(); } public void get () { lock.lock(); try { System.out.println(Thread.currentThread().getId()+"\t" +"get()" ); set(); }finally { lock.unlock(); } } public void set () { lock.lock(); try { System.out.println(Thread.currentThread().getId()+"\t" +"set()" ); }finally { lock.unlock(); } } }
锁的配对 锁之间要配对,加了几把锁,最后就得解开几把锁,下面的代码编译和运行都没有任何问题,但锁的数量不匹配会导致死循环。
1
2
3
4
5
6
7
lock.lock(); lock.lock(); try { someAction(); }finally { lock.unlock(); }
自旋锁 所谓自旋锁,就是尝试获取锁的线程不会立即阻塞 ,而是采用循环的方式去尝试获取 。自己在那儿一直循环获取,就像“自旋 ”一样。这样的好处是减少线程切换的上下文开销 ,缺点是会消耗CPU 。CAS底层的getAndAddInt就是自旋锁 思想。
1 2 while (!atomicReference.compareAndSet(null , thread)) { }
SpinLockDemo:
1
2
3
4
5
6
7
8
9
10
11
12
13
14
15
16
17
18
19
20
21
22
23
24
25
26
27
28
29
30
31
32
33
34
35
36
37
38
39
40
41
42
43
44
45
46
47
48
49
import java.util.concurrent.TimeUnit;import java.util.concurrent.atomic.AtomicReference;public class SpinLocDemo { AtomicReference<Thread> threadAtomicReference = new AtomicReference <>(); public void lock () { Thread thread = Thread.currentThread(); System.out.println(thread.getName() + "\t come in..." ); while (!threadAtomicReference.compareAndSet(null , thread)) { } } public void unlock () { Thread thread = Thread.currentThread(); threadAtomicReference.compareAndSet(thread, null ); System.out.println(thread.getName() + "\t unlock..." ); } public static void main (String[] args) { SpinLocDemo spinLocDemo = new SpinLocDemo (); new Thread (() -> { spinLocDemo.lock(); try { TimeUnit.SECONDS.sleep(2 ); } catch (InterruptedException e) { e.printStackTrace(); } spinLocDemo.unlock(); }, "AA" ).start(); new Thread (() -> { spinLocDemo.lock(); try { TimeUnit.SECONDS.sleep(2 ); } catch (InterruptedException e) { e.printStackTrace(); } spinLocDemo.unlock(); }, "BB" ).start(); } }
读写锁/独占/共享锁 读锁 是共享的 ,写锁 是独占的 。juc.ReentrantLock和synchronized都是独占锁 ,独占锁就是一个锁 只能被一个线程 所持有。有的时候,需要读写分离 ,那么就要引入读写锁,即juc.ReentrantReadWriteLock。
比如缓存,就需要读写锁来控制。缓存就是一个键值对,以下Demo模拟了缓存的读写操作,读的get方法使用了ReentrantReadWriteLock.ReadLock(),写的put方法使用了ReentrantReadWriteLock.WriteLock()。这样避免了写被打断,实现了多个线程同时读。
ReadWriteLockDemo
1
2
3
4
5
6
7
8
9
10
11
12
13
14
15
16
17
18
19
20
21
22
23
24
25
26
27
28
29
30
31
32
33
34
35
36
37
38
39
40
41
42
43
44
45
46
47
48
49
50
51
52
53
54
55
56
57
58
59
60
61
62
63
64
65
66
67
68
69
70
import java.util.HashMap;import java.util.Map;import java.util.concurrent.TimeUnit;import java.util.concurrent.locks.ReentrantReadWriteLock;public class ReadWriteLockDemo { public static void main (String[] args) { MyCache myCache = new MyCache (); for (int i = 0 ; i < 5 ; i++) { final int tempInt = i; new Thread (() -> myCache.put(tempInt + "" , tempInt + "" ), String.valueOf(i)).start(); } for (int i = 0 ; i < 5 ; i++) { final int tempInt = i; new Thread (() -> myCache.get(tempInt + "" ), String.valueOf(i)).start(); } } } class MyCache { private volatile Map<String, Object> map = new HashMap <>(); private ReentrantReadWriteLock rwLock = new ReentrantReadWriteLock (); public void put (String key, Object value) { rwLock.writeLock().lock(); try { System.out.println(Thread.currentThread().getName() + "\t 正在写入:" + key); try { TimeUnit.MICROSECONDS.sleep(300 ); } catch (InterruptedException e) { e.printStackTrace(); } map.put(key, value); System.out.println(Thread.currentThread().getName() + "\t 写入完成:" + key); } catch (Exception e) { e.printStackTrace(); } finally { rwLock.writeLock().unlock(); } } public Object get (String key) { Object value = null ; rwLock.readLock().lock(); try { System.out.println(Thread.currentThread().getName() + "\t 正在读取:" + key); try { TimeUnit.MICROSECONDS.sleep(300 ); } catch (InterruptedException e) { e.printStackTrace(); } value = map.get(key); System.out.println(Thread.currentThread().getName() + "\t 读取完成:" + value); } catch (Exception e) { e.printStackTrace(); } finally { rwLock.readLock().unlock(); } return value; } }
Synchronized和Lock的区别 synchronized关键字和java.util.concurrent.locks.Lock都能加锁,两者有什么区别呢?
原始构成 :sync是JVM层面的,底层通过monitorenter和monitorexit来实现的。Lock是JDK API层面的。(sync一个enter会有两个exit,一个是正常退出,一个是异常退出)使用方法 :sync不需要手动释放锁,而Lock需要手动释放。是否可中断 :sync不可中断,除非抛出异常或者正常运行完成。Lock是可中断的,通过调用interrupt()方法。是否为公平锁 :sync只能是非公平锁,而Lock既能是公平锁,又能是非公平锁。**绑定多个条件Condition**:sync不能,只能随机唤醒。而Lock可以通过Condition来绑定多个条件,精确唤醒。
CountDownLatch/CyclicBarrier/Semaphore CountDownLatch CountDownLatch内部维护了一个计数器 ,只有当计数器==0 时,某些线程才会停止阻塞,开始执行。
CountDownLatch主要有两个方法,countDown()来让计数器-1,await()来让线程阻塞。当count==0时,阻塞线程自动唤醒。
案例一班长关门 :main线程是班长,6个线程是学生。只有6个线程运行完毕,都离开教室后,main线程班长才会关教室门。
案例二秦灭六国 :只有6国都被灭亡后(执行完毕),main线程才会显示“秦国一统天下”。
枚举类的使用 在案例二 中会使用到枚举类,因为灭六国,循环6次,想根据i的值来确定输出什么国,比如1代表楚国,2代表赵国。如果用判断则十分繁杂,而枚举类可以简化操作。
枚举类就像一个简化的数据库 ,枚举类名就像数据库名,枚举的项目就像数据表,枚举的属性就像表的字段。
CountDownLatchDemo:
1
2
3
4
5
6
7
8
9
10
11
12
13
14
15
16
17
18
19
20
21
22
23
24
25
26
import java.util.concurrent.CountDownLatch;public class CountdownLatchDemo { public static void main (String[] args) throws InterruptedException { closeDoor(); } private static void closeDoor () throws InterruptedException { CountDownLatch countDownLatch = new CountDownLatch (6 ); for (int i = 0 ; i < 6 ; i++) { new Thread (() -> { countDownLatch.countDown(); System.out.println(Thread.currentThread().getName() + "\t 上完课,go" ); }, String.valueOf(i)).start(); } countDownLatch.await(); System.out.println("***** 班长上完课,关门,go" ); } }
CyclicBarrier CountDownLatch是减,而CyclicBarrier是加,理解了CountDownLatch,CyclicBarrier就很容易。比如召集7颗龙珠才能召唤神龙。
CyclicBarrierDemo:
1
2
3
4
5
6
7
8
9
10
11
12
13
14
15
16
17
18
19
20
21
22
23
24
25
26
27
28
29
30
import java.util.concurrent.BrokenBarrierException;import java.util.concurrent.CyclicBarrier;public class CyclicBarrierDemo { public static void main (String[] args) { CyclicBarrier cyclicBarrier = new CyclicBarrier (7 , () -> System.out.println("*****召唤神龙" )); for (int i = 1 ; i <= 7 ; i++) { final int finalI = i; new Thread (() -> { System.out.println(Thread.currentThread().getName() + "\t 收集到第:" + finalI + "龙珠" ); try { cyclicBarrier.await(); } catch (InterruptedException | BrokenBarrierException e) { e.printStackTrace(); } }, String.valueOf(i)).start(); } } }
Semaphore CountDownLatch的问题是不能复用 。比如count=3,那么加到3,就不能继续操作了。而Semaphore可以解决这个问题,比如6辆车3个停车位,对于CountDownLatch只能停3辆车 ,而Semaphore可以停6辆车,车位空出来后,其它车可以占有,这就涉及到了Semaphore.accquire()和Semaphore.release()方法。
1
2
3
4
5
6
7
8
9
10
11
12
13
14
15
16
17
18
19
20
21
22
23
24
25
26
27
28
import java.util.concurrent.Semaphore;import java.util.concurrent.TimeUnit;public class SemaphoreDemo { public static void main (String[] args) { Semaphore semaphore = new Semaphore (3 ); for (int i = 1 ; i <= 6 ; i++) { new Thread (() -> { try { semaphore.acquire(); System.out.println("第" + Thread.currentThread().getName() + "量汽车抢到了车位" ); TimeUnit.SECONDS.sleep(3 ); } catch (InterruptedException e) { e.printStackTrace(); } finally { System.out.println("第" + Thread.currentThread().getName() + "量汽车停车3秒后离开车位" ); semaphore.release(); } }, String.valueOf(i)).start(); } } }
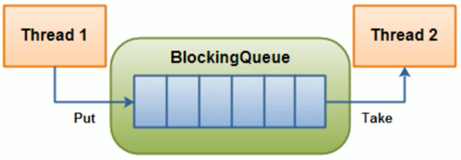
阻塞队列 概念 :当阻塞队列为空时,获取(take)操作是阻塞的;当阻塞队列为满时,添加(put)操作是阻塞的。
好处 :阻塞队列不用手动控制什么时候该被阻塞,什么时候该被唤醒,简化了操作。
体系 :Collection→Queue→BlockingQueue→七个阻塞队列实现类。
类名
作用
ArrayBlockingQueue 由数组 构成的有界 阻塞队列
LinkedBlockingQueue 由链表 构成的有界 阻塞队列
PriorityBlockingQueue
支持优先级排序的无界阻塞队列
DelayQueue
支持优先级的延迟无界阻塞队列
SynchronousQueue 单个元素的阻塞队列
LinkedTransferQueue
由链表构成的无界阻塞队列
LinkedBlockingDeque
由链表构成的双向阻塞队列
粗体标记的三个用得比较多,许多消息中间件底层就是用它们实现的。
需要注意的是LinkedBlockingQueue虽然是有界的,但有个巨坑,其默认大小是Integer.MAX_VALUE,高达21亿,一般情况下内存早爆了(在线程池的ThreadPoolExecutor有体现)。
API :抛出异常是指当队列满时,再次插入会抛出异常;返回布尔是指当队列满时,再次插入会返回false;阻塞是指当队列满时,再次插入会被阻塞,直到队列取出一个元素,才能插入。超时是指当一个时限过后,才会插入或者取出。
方法类型
抛出异常
返回布尔
阻塞
超时
插入
add(E e)
offer(E e)
put(E e)
offer(E e,Time,TimeUnit)
取出
remove()
poll()
take()
poll(Time,TimeUnit)
队首
element()
peek()
无
无
抛出异常
当阻塞队列满时,再往队列里面add插入元素会抛IllegalStateException: Queue full
特殊值
插入方法,成功返回true 失败返回false
一直阻塞
当阻塞队列满时,生产者继续往队列里面put元素,队列会一直阻塞直到put数据or响应中断退出。
超时退出
当阻塞队列满时,队列会阻塞生产者线程一定时间,超过后限时后生产者线程就会退出
SynchronousQueue 队列只有一个元素,如果想插入多个,必须等队列元素取出后,才能插入,只能有一个“坑位”,用一个插一个,详见
SynchronousQueueDemo:
1
2
3
4
5
6
7
8
9
10
11
12
13
14
15
16
17
18
19
20
21
22
23
24
25
26
27
28
29
30
31
32
33
34
35
36
37
38
39
import java.util.concurrent.BlockingQueue;import java.util.concurrent.SynchronousQueue;import java.util.concurrent.TimeUnit;public class SynchronousQueueDemo { public static void main (String[] args) { BlockingQueue<String> blockingQueue = new SynchronousQueue <>(); new Thread (() -> { try { System.out.println(Thread.currentThread().getName() + "\t put 1" ); blockingQueue.put("1" ); System.out.println(Thread.currentThread().getName() + "\t put 2" ); blockingQueue.put("2" ); System.out.println(Thread.currentThread().getName() + "\t put 3" ); blockingQueue.put("3" ); } catch (InterruptedException e) { e.printStackTrace(); } }, "AAA" ).start(); new Thread (() -> { try { TimeUnit.SECONDS.sleep(5 ); System.out.println(Thread.currentThread().getName() + "\t" + blockingQueue.take()); TimeUnit.SECONDS.sleep(5 ); System.out.println(Thread.currentThread().getName() + "\t" + blockingQueue.take()); TimeUnit.SECONDS.sleep(5 ); System.out.println(Thread.currentThread().getName() + "\t" + blockingQueue.take()); } catch (InterruptedException e) { e.printStackTrace(); } }, "BBB" ).start(); } }
Callable接口 与Runnable的区别 :
Callable带返回值。
会抛出异常。
覆写call()方法,而不是run()方法。
Callable接口的使用 :
1
2
3
4
5
6
7
8
9
10
11
12
13
14
15
16
17
18
19
20
21
22
23
24
25
26
27
28
29
30
31
32
33
34
35
36
37
import java.util.concurrent.Callable;import java.util.concurrent.FutureTask;public class CallableDemo { public static void main (String[] args) { FutureTask<Integer> futureTask = new FutureTask <>(() -> { System.out.println("come in callable" ); return 1234 ; }); FutureTask<Integer> futureTask2 = new FutureTask <>(new Callable <Integer>() { @Override public Integer call () throws Exception { System.out.println("come in callable" ); return 1234 ; } }); FutureTask<Integer> futureTask3 = new FutureTask <Integer>(() -> System.out.println("come in runnable" ), 1024 ); FutureTask<Integer> futureTask4 = new FutureTask <Integer>(new Runnable () { @Override public void run () { System.out.println("come in runnable" ); } }, 1024 ); Thread t1 = new Thread (futureTask, "AAA" ); t1.start(); } }
阻塞队列的应用——生产者消费者 传统模式 传统模式使用Lock来进行操作,需要手动加锁、解锁。
ProdConsTradiDemo:
1
2
3
4
5
6
7
8
9
10
11
12
13
14
15
16
17
18
19
20
21
22
23
24
25
26
27
28
29
30
31
32
33
34
35
36
37
38
39
40
41
42
43
44
45
46
47
48
49
50
51
52
53
54
55
56
57
58
59
60
61
62
63
64
65
66
67
68
69
70
71
72
73
74
75
76
77
78
79
80
81
82
83
import java.util.concurrent.locks.Condition;import java.util.concurrent.locks.Lock;import java.util.concurrent.locks.ReentrantLock;public class ProductConsumerTraditionDemo { public static void main (String[] args) { ShareData shareData = new ShareData (); new Thread (() -> { try { for (int i = 1 ; i <= 5 ; i++) { shareData.increment(); } } catch (InterruptedException e) { e.printStackTrace(); } }, "AAA" ).start(); new Thread (() -> { try { for (int i = 1 ; i <= 5 ; i++) { shareData.decrement(); } } catch (InterruptedException e) { e.printStackTrace(); } }, "BBB" ).start(); } } class ShareData { private int number = 0 ; private Lock lock = new ReentrantLock (); private Condition condition = lock.newCondition(); public void increment () throws InterruptedException { lock.lock(); try { while (number != 0 ) { condition.await(); } number++; System.out.println(Thread.currentThread().getName() + "\tincrement " + number); condition.signalAll(); } catch (Exception e) { e.printStackTrace(); } finally { lock.unlock(); } } public void decrement () throws InterruptedException { lock.lock(); try { while (number == 0 ) { condition.await(); } number--; System.out.println(Thread.currentThread().getName() + "\tdecrement " + number); condition.signalAll(); } catch (Exception e) { e.printStackTrace(); } finally { lock.unlock(); } } }
阻塞队列模式 使用阻塞队列就不需要手动加锁了
ProducerConsumerBlockQueueDemo:
1
2
3
4
5
6
7
8
9
10
11
12
13
14
15
16
17
18
19
20
21
22
23
24
25
26
27
28
29
30
31
32
33
34
35
36
37
38
39
40
41
42
43
44
45
46
47
48
49
50
51
52
53
54
55
56
57
58
59
60
61
62
63
64
65
66
67
68
69
70
71
72
73
74
75
76
77
78
79
80
81
82
83
84
85
86
87
88
89
90
91
92
93
94
95
96
97
98
99
100
package com.monochrome.thread;import java.util.concurrent.ArrayBlockingQueue;import java.util.concurrent.BlockingQueue;import java.util.concurrent.TimeUnit;import java.util.concurrent.atomic.AtomicInteger;import java.util.concurrent.locks.Lock;import java.util.concurrent.locks.ReentrantLock;public class ProducerConsumerBlockQueueDemo { public static void main (String[] args) { MyResource myResource = new MyResource (new ArrayBlockingQueue <>(10 )); new Thread (() -> { System.out.println("生产者线程启动!" ); try { myResource.product(); } catch (Exception e) { e.printStackTrace(); } },"producer" ).start(); new Thread (() -> { System.out.println("消费者线程启动!" ); try { myResource.consume(); } catch (Exception e) { e.printStackTrace(); } },"consumer" ).start(); try { TimeUnit.SECONDS.sleep(5 ); System.out.println("5秒后叫停" ); myResource.stop(); } catch (Exception e) { e.printStackTrace(); } } } class MyResource { private final Lock lock = new ReentrantLock (); private volatile boolean FLAG = true ; private final AtomicInteger atomicInteger = new AtomicInteger (); private BlockingQueue<String> blockingQueue = null ; public MyResource (BlockingQueue<String> blockingQueue) { this .blockingQueue = blockingQueue; System.out.println(blockingQueue.getClass().getName()); } public void product () throws Exception { String data = null ; boolean returnVal; while (FLAG) { data = atomicInteger.incrementAndGet() + "" ; returnVal = blockingQueue.offer(data, 2L , TimeUnit.SECONDS); if (returnVal) { System.out.println(Thread.currentThread().getName() + "\t插入队列" + data + "成功" ); } else { System.out.println(Thread.currentThread().getName() + "\t插入队列" + data + "失败" ); } TimeUnit.SECONDS.sleep(1 ); } System.out.println(Thread.currentThread().getName() + " STOP,表明FLAG=false,生产结束" ); } public void consume () throws Exception { String result = null ; while (FLAG) { result = blockingQueue.poll(2L , TimeUnit.SECONDS); if (result == null || result.equalsIgnoreCase("" )) { FLAG = false ; System.out.println(Thread.currentThread().getName() + "\t超过2秒没有获取到产品,消费退出" ); return ; } System.out.println(Thread.currentThread().getName() + "\t消费队列" + result + "成功" ); } System.out.println(Thread.currentThread().getName() + " STOP,表明FLAG=false,生产结束" ); } public void stop () throws Exception { this .FLAG = false ; } }
阻塞队列的应用——线程池 线程池基本概念 概念 :线程池主要是控制运行线程的数量,将待处理任务放到等待队列,然后创建线程执行这些任务。如果超过了最大线程数,则等待。
优点 :
线程复用:不用一直new新线程,重复利用已经创建的线程来降低线程的创建和销毁开销,节省系统资源。
提高响应速度:当任务达到时,不用创建新的线程,直接利用线程池的线程。
管理线程:可以控制最大并发数,控制线程的创建等。
体系 :Executor→ExecutorService→AbstractExecutorService→ThreadPoolExecutor。ThreadPoolExecutor是线程池创建的核心类。类似Arrays、Collections工具类,Executor也有自己的工具类Executors。
线程池三种常用创建方式 1 2 3 4 5 6 7 8 9 10 11 12 13 14 15 16 17 18 19 20 21 22 23 24 25 26 27 28 29 30 import java.util.concurrent.ExecutorService;import java.util.concurrent.Executors;import java.util.concurrent.TimeUnit;public class ThreadPoolDemo { public static void main (String[] args) { ExecutorService threadPool = Executors.newCachedThreadPool(); try { for (int i = 1 ; i <= 10 ; i++) { threadPool.execute(() -> { System.out.println(Thread.currentThread().getName() + "\t办理业务" ); }); TimeUnit.MICROSECONDS.sleep(200 ); } } catch (Exception e) { e.printStackTrace(); } finally { threadPool.shutdown(); } } }
newFixedThreadPool :使用LinkedBlockingQueue实现,定长线程池。
1
2
3
4
5
public static ExecutorService newFixedThreadPool (int nThreads) { return new ThreadPoolExecutor (nThreads, nThreads, 0L , TimeUnit.MILLISECONDS, new LinkedBlockingQueue <Runnable>()); }
newSingleThreadExecutor :使用LinkedBlockingQueue实现,一池只有一个线程。
1
2
3
4
5
public static ExecutorService newSingleThreadExecutor () { return new FinalizableDelegatedExecutorService (new ThreadPoolExecutor (1 , 1 , 0L , TimeUnit.MILLISECONDS, new LinkedBlockingQueue <Runnable>())); }
newCachedThreadPool :使用SynchronousQueue实现,变长线程池。
1
2
3
4
5
public static ExecutorService newCachedThreadPool () { return new ThreadPoolExecutor (0 , Integer.MAX_VALUE, 60L , TimeUnit.SECONDS, new SynchronousQueue <Runnable>()); }
线程池创建的七个参数
参数
意义
corePoolSize
线程池常驻核心线程数
maximumPoolSize
能够容纳的最大线程数
keepAliveTime
空闲线程存活时间
unit
存活时间单位
workQueue
存放提交但未执行任务的队列
threadFactory
创建线程的工厂类
handler
等待队列满后的拒绝策略
理解 :线程池的创建参数,就像一个银行 。
corePoolSize就像银行的“当值窗口 “,比如今天有2位柜员 在受理客户请求 (任务)。如果超过2个客户,那么新的客户就会在等候区 (等待队列workQueue)等待。当等候区 也满了,这个时候就要开启“加班窗口 ”,让其它3位柜员来加班,此时达到最大窗口 maximumPoolSize,为5个。如果开启了所有窗口,等候区依然满员,此时就应该启动”拒绝策略 “handler,告诉不断涌入的客户,叫他们不要进入,已经爆满了。由于不再涌入新客户,办完事的客户增多,窗口开始空闲,这个时候就通过keepAlivetTime将多余的3个”加班窗口“取消,恢复到2个”当值窗口“。
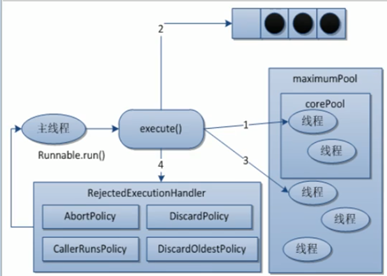
线程池底层原理 原理图 :上面银行的例子,实际上就是线程池的工作原理。
在创建了线程池后,等待提交过来的任务请求。
当调用execute()方法添加一-个请求任务时,线程池会做如下判断:
如果正在运行的线程数量小于corePoolSize,那么马上创建线程运行这个任务
如果正在运行的线程数量大于或等于corePoolSize,那么将这个任务放入队列
如果这时候队列满了且正在运行的线程数量还小于maximumPoolSize,那么还是要创建非核心线程立刻运行 这个任务
如果队列满了且正在运行的线程数量大于或等于maximumPoolSize,那么线程池会启动饱和拒绝策略来执行
当一个线程完成任务时,它会从队列中取下一个任务来执行。
当一个线程无事可做超过一定的时间(keepAliveTime) 时,线程池会判断:
如果当前运行的线程数大于corePoolSize,那么这个线程就被停掉。
流程图 :
新任务到达→
如果正在运行的线程数小于corePoolSize,创建核心线程;大于等于corePoolSize,放入等待队列。
如果等待队列已满,但正在运行的线程数小于maximumPoolSize,创建非核心线程;大于等于maximumPoolSize,启动拒绝策略。
当一个线程无事可做一段时间keepAliveTime后,如果正在运行的线程数大于corePoolSize,则关闭非核心线程。
线程池的拒绝策略 当等待队列满时,且达到最大线程数,再有新任务到来,就需要启动拒绝策略。JDK提供了四种拒绝策略,分别是。
AbortPolicy :默认的策略,直接抛出RejectedExecutionException异常,阻止系统正常运行。CallerRunsPolicy :既不会抛出异常,也不会终止任务,而是将任务返回给调用者。DiscardOldestPolicy :抛弃队列中等待最久的任务,然后把当前任务加入队列中尝试再次提交任务。DiscardPolicy :直接丢弃任务,不做任何处理。
实际生产使用哪一个线程池? 单一、可变、定长都不用 !原因就是FixedThreadPool和SingleThreadExecutor底层都是用LinkedBlockingQueue实现的,这个队列最大长度为Integer.MAX_VALUE,显然会导致OOM(Out Of Memery)。所以实际生产一般自己通过ThreadPoolExecutor的7个参数,自定义线程池。
1
2
3
4
5
ExecutorService threadPool = new ThreadPoolExecutor (2 ,5 , 1L ,TimeUnit.SECONDS, new LinkedBlockingQueue <>(3 ), Executors.defaultThreadFactory(), new ThreadPoolExecutor .AbortPolicy());
自定义线程池参数选择 查看CPU核数:System.out.println(Runtime.getRuntime().availableProcessors());
CPU密集型:CPU密集的意思是该任务需要大量的运算,而没有阻塞,CPU一直全速运行。CPU密集型任务配置尽可能少的线程数量:一般公式: CPU核 数+1介线程的线程池。
IO密集型任务:任务需要大量的IO,即大量的阻塞,因此尽量多配点,可以是CPU线程数*2,或者CPU线程数/(1-阻塞系数)。
死锁编码和定位 1 2 3 4 5 6 7 8 9 10 11 12 13 14 15 16 17 18 19 20 21 22 23 24 25 26 27 28 29 30 31 32 33 34 35 36 37 38 39 40 41 42 43 44 45 46 47 48 49 50 51 import java.util.concurrent.TimeUnit;public class DeadLockDemo { public static void main (String[] args) { String lockA = "lockA" ; String lockB = "lockB" ; new Thread (new HoldLockThread (lockA, lockB), "ThreadAAA" ).start(); new Thread (new HoldLockThread (lockB, lockA), "ThreadBBB" ).start(); } } class HoldLockThread implements Runnable { public HoldLockThread (String lockA, String lockB) { this .lockA = lockA; this .lockB = lockB; } private String lockA; private String lockB; @Override public void run () { synchronized (lockA) { System.out.println(Thread.currentThread().getName() + "\t自己持有" + lockA + ",尝试获取:" + lockB); try { TimeUnit.SECONDS.sleep(2 ); } catch (InterruptedException e) { e.printStackTrace(); } synchronized (lockB) { System.out.println(Thread.currentThread().getName() + "\t自己持有" + lockB + ",尝试获取:" + lockA); try { TimeUnit.SECONDS.sleep(2 ); } catch (InterruptedException e) { e.printStackTrace(); } } } } }
主要是两个命令配合起来使用,定位死锁。
jps 指令:jps -l可以查看运行的Java进程。
1
2
9688 thread.DeadLockDemo12177 sun.tools.jps.Jps
jstack 指令:jstack pid可以查看某个Java进程的堆栈信息,同时分析出死锁。
1
2
3
4
5
6
7
8
9
10
11
12
13
14
Java stack information for the threads listed above: =================================================== "ThreadBBB" : at com.monochrome.thread.HoldLockThread.run(DeadLockDemo.java:43 ) - waiting to lock <0x00000006edd5eae8 > (a java.lang.String) - locked <0x00000006edd5eb20 > (a java.lang.String) at java.lang.Thread.run(Thread.java:748 ) "ThreadAAA" : at com.monochrome.thread.HoldLockThread.run(DeadLockDemo.java:43 ) - waiting to lock <0x00000006edd5eb20 > (a java.lang.String) - locked <0x00000006edd5eae8 > (a java.lang.String) at java.lang.Thread.run(Thread.java:748 ) Found 1 deadlock.
 JMM可能带来可见性、原子性和有序性问题。所谓可见性,就是某个线程对主内存内容的更改,应该立刻通知到其它线程。原子性是指一个操作是不可分割的,不能执行到一半,就不执行了。所谓有序性,就是指令是有序的,不会被重排。